Set Up The e2e Project For A Hybrid Android App
In this article, I’m up to share how to set up the Automation Testing environment for a mobile hybrid application. To get more experience in setting up an e2e project using WebdriverIO, I’ve decided to try it out in practice.
I’ve used precise module versions, which you will encounter in the article. I’ve just gotten along with them to configure and launch tests. However, you can use other versions of modules.
Now let’s get down to business.
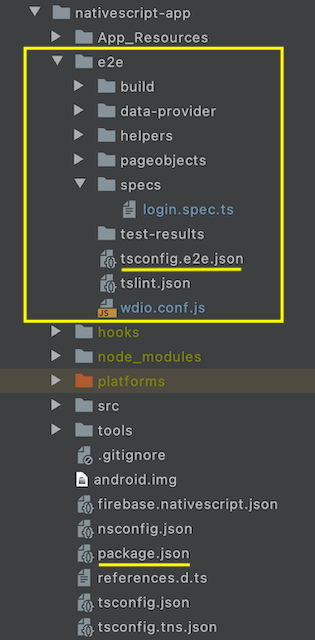
In the very beginning, I would like to point out the e2e project structure:

As you can see, testing hybrid mobile applications implies to use page object pattern as well.
Note, I used the same app package.json file for the e2e project too. However, you can create a single package.json aimed at your e2e project only.
Table of contents
1. Stack description
2. Prerequisites
3. Setting up
4. Selectors
5. Writing tests with Jasmine
6. Sources
7. Conclusion
1. Stack description
The experiment relies on Breethe, a hybrid mobile app, played out using NativeScript ( {N} ), an open-source framework to develop mobile apps on iOS and Android OS platforms.
Thus, we’ve chosen Appium, WebdriverIO, and Jasmine, a BDD framework intended for writing tests on JS.
2. Prerequisites
2.1 Primarily, we install Java 8
2.2 Then, we install Android Studio
2.3 Last but not least, we have to point the paths for the following values:
- JAVA_HOME;
- ANDROID_HOME.
3. Setting up
3.1 Appium
3.2 Setting up the Appium client, WebdriverIO
3.3 Install WebdriverIO CLI
3.4 Generate Configuration File (wdio.config.js)
3.5 Configuring wdio.config.js
3.6 Designing tsconfig.json file
3.7 Explore package.json
This part is a step-by-step guide leading how to configure an e2e project.
3.1 Appium
Installation:
npm install — save-dev appium@1.16.0
To verify that all of Appium dependencies are met, run npm install -g appium-doctor, then run the appium-doctor — android command (for iOS supply the ios flag).
3.2 Setting up the Appium client, WebdriverIO
First, create a directory for your e2e project. Within the directory run the next command in the terminal:
npm init -y
In case of using an app package.json, you can skip running npm init -y.
Then, install WebdriverIO globally:
npm i webdriverio@6.6.7
3.3 Install WebdriverIO CLI
Not only will WebdriverIO test runner perform all the work for you, but also it helps you to run your tests as efficiently as possible. Nevertheless, the test runner is a helpful
assistant in your project for integration testing. It comes with lots of useful features that make your life easier.
npm i — save-dev @wdio/cli@5.18.5
3.4 Generate Configuration File
Next, you’ll generate a configuration file to store your WebdriverIO settings. To do that, just run the configuration utility within the e2e directory
npx wdio config
You’ll be asked to pick up necessary configuration parts such as those listed below (in the brackets I’ve put configuration parts I’ve chosen):
● Where should your tests be launched? (local)
● Where is your automation backend located? (on my local machine)
● Which framework do you want to use? (Jasmine)
● Do you want to run WebdriverIO commands synchronous or asynchronous? (sync. As of 14/04/2021 sync mode will not be supported anymore starting from Node.js v16 due to changes in Chromium)
● Where are your test specs located? (./e2e/specs/*.ts)
● Which reporter do you want to use? (spec)
● Do you want to add a service to your test setup? (Appium)
● What is the base URL? (http://localhost)
As a result, a wdio.config.js file will be built for you.
The next step is adding demanded WebdriverIO options.
Also, you have to install the following items:
1. npm install @wdio/jasmine-framework@5.16.15 — save-dev
2. npm install @wdio/appium-service@5.16.5 — save-dev
3.5 Configuring wdio.config.js
It’s implied adding WebdriverIO options. You can find a whole list of options on WebdriverIO Official site.
I propose you to explore the completed and working configuration presented below:
const host = "0.0.0.0";
const port = 4723;

const waitForTimeout = 30 * 60000;
const commandTimeout = 30 * 60000;

exports.config = {
  deprecationWarnings: false,
  debug: false,
  host: host,
  port: port,

  specs: [
    "./e2e/specs/login.spec.ts"
  ],

  maxInstances: 1,
  capabilities: [
    {
      authomationName: "UiAutomator2",
      platformName: "Android",
      platformVersion: "10.0",
      appiumVersion: "1.16.0",
      app: "/Users/user/path_to_apk/app-debug.apk",
      deviceName: "Samsung_Galaxy_Note_20_API29",
      waitForTimeout: waitForTimeout,
      commandTimeout: commandTimeout,
      appWaitDuration: 30 * 60000,
      dbExecTimeout: 30 * 60000,
      androidInstallTimeout: 30 * 60000,
      newCommandTimeout: 60000,
      noReset: true,
      fullReset: false,
      appWaitActivity: "com.tns.NativeScriptActivity",
      appActivity: "com.tns.NativeScriptActivity",
      appPackage: "com.Meditation.app",
      adbExecTimeout: 80000,
      avdLaunchTimeout: 30 * 300000
    }],

  reporters: ["spec"],
  sync: true,

  services: ["appium"],

  "appium": {
    waitStartTime: 6000,
    waitForTimeout: waitForTimeout,
    command: "appium",
    logFileName: "./e2e/appium.log",
    args: {
      address: host,
      port: port,
      commandTimeout: commandTimeout,
      sessionOverride: true,
      debugLogSpacing: true
    }
  },

  logLevel: "silent",
  coloredLogs: true,
  allScriptsTimeout: 280000,
  getPageTimeout: 300000,

  framework: "jasmine",
  jasmineNodeOpts: {
    showColors: true,
    defaultTimeoutInterval: 60000,
    requires: ["ts-node/register"]
  },

  before: functiuiautomator2on() {
    require("ts-node").register({
      project: require("path").join(__dirname, "./tsconfig.e2e.json")
    });
  },

  onPrepare: function() {
    console.log("<<< NATIVE APP TESTS HAVE STARTED >>>");
  },

  onComplete: function() {
    console.log("<<< TESTING HAS FINISHED >>>");
  }
}
Note. Let me explain several clauses.
The first one is setting up TypeScript. You have to add the following code into wdio.config.js:
jasmineNodeOpts: {requires: ['ts-node/register']},
If you use another framework in place of Jasmine, you can find a setup for TypeScript on https://v6.webdriver.io/docs/typescript.html.
Now, your configuration is almost complete. Just several steps are left.
3.6 Designing tsconfig.json file
{
"compilerOptions": {
"baseUrl": ".",
"paths": {
"*": [ "./*" ],
"src/*": ["./src/*"]
},
"types": ["node", "webdriverio"]
},
"include": [
"./src/**/*.ts"
]
}Although WebdriverIO insists that we add paths, I haven’t included this part in my tsconfig.e2e.json.
In case you encounter the necessity, add paths as it’s done in the code fragment above.
The “webdriverio” type is intended for synchronous use.
As I noted before, I used an asynchronous way and put ”@wdio/sync” into the types clause.
Also, we have to add a framework type. For Jasmine, it’s “@wdio/jasmine-framework”
Therefore, my tsconfig.e2e.json appears in fashion:
{
  "compilerOptions": {
    "module": "commonjs",
    "target": "es6",
    "moduleResolution": "node",
    "sourceMap": false,
    "declaration": false,
    "noEmitHelpers": false,
    "noEmitOnError": true,
    "importHelpers": true,
    "emitDecoratorMetadata": true,
    "experimentalDecorators": true,
    "removeComments": false,
    "noImplicitAny": false,
    "outDir": "typeScript",
    "typeRoots": [ "../node_modules/@types" ],
    "types": ["node", "jasmine","@wdio/sync", "@wdio/jasmine-framework"],
    "skipLibCheck": true,
    "lib": [
      "es2017",
      "dom",
      "es6",
      "webworker"
    ],
    "baseUrl": "."
  },
  "include": [
    "./**/*.ts"
  ],
  "exclude": [
    "../../../node_modules",
    "node_modules",
    "typescript"
  ]
}
3.7 Explore package.json
Be certain that your package.json file includes the following modules in the devDependencies clause:
"@types/jasmine": "3.5.0","@wdio/appium-service": "5.16.5","@wdio/cli": "5.18.5","@wdio/jasmine-framework": "5.16.15","@wdio/local-runner": "5.18.5","@wdio/spec-reporter": "5.16.11","@wdio/sync": "5.18.5","appium": "1.16.0"
4 Selectors
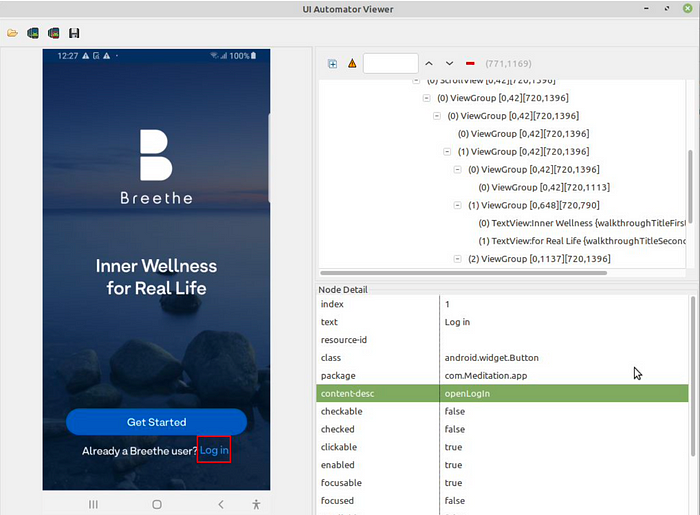
A good option to write well maintainable tests is to use the accessibility id locator strategy. This has the benefit of not changing during localization or any other process that might change text.
To find elements, follow the examples below:
"//android.widget.EditText[contains(@content-desc, 'loginEmail') or contains(@text, 'Email')]""//android.widget.Button[contains(@text,'Log in')]""//android.widget.TextView[contains(@resource-id, 'android:id/message') or contains(@text,'Please enter a valid email address format.')]"
Also, you can find other strategies in WebdriverIO manual.
To find locators, you can use Appium or UI Automator Viewer. The last one is frankly stunning since you don’t have to run the Appium server.

5. Writing tests with Jasmine
You can find all necessary information regarding tests syntax as well as assertion functions in Jasmine official guide.
You can group test specs in suites and run single specific suites instead of all of them at once.
Define your suites in your WDIO config:
exports.config = {// define all testsspecs: ['./test/specs/**/*.spec.js'],// ...// define specific suitessuites: {login: ['./test/specs/login.success.spec.js','./test/specs/login.failure.spec.js'],otherFeature: [// ...]},// ...}
Now, if you want to only run a single suite, you can pass the suite name as a CLI argument:
wdio wdio.conf.js — suite login
Or run multiple suites at once:
wdio wdio.conf.js — suite login — suite otherFeature
To run selected tests, you have to use — spec parameter.
For example, to run only your login test:
wdio wdio.conf.js — spec ./test/specs/e2e/login.js
Or run multiple specs at once:
wdio wdio.conf.js — spec ./test/specs/signup.js — spec ./test/specs/forgot-password.js
Also, you can add scripts into package.json in order to make short commands:
“e2e”: “wdio ./e2e/wdio.conf.js”
Follow the WebdriverIO guide to get more details.
6. Sources
You can taste all advantages of Appium and WebdriverIO by following the next official resources:
Note. If you run into any issues, you can ask questions on Gitter Channel and post the error you’re seeing.
7. Conclusion
Let’s sum up general points to keep the shortlist of necessary steps in mind:
1. We have to use Java 8 for testing mobile applications on Android OS.
2. Point the way for the following values and save them permanently:
- JAVA_HOME;
- ANDROID_HOME.
3. Install Appium, WebdriverIO, and WebdriverIO CLI
4. Generate and set up configuration file wdio.config.js
5. Design tsconfig.json file
6. Write tests
I believe that the article will help you set-up an e2e project and run test cases.